Practically every university, school and college is facing the challenge of moving their teaching online. Till Winkler is an Associate Professor of Digitalization and the Associate Dean for Digital Curriculum at Copenhagen Business School. As a teacher, he has been using video-based instruction since 2016 and since then he has been experimenting with different modes of online and blended learning. He created this 10-step guide for his colleagues, and with his permission we are including it here.
While many universities and business schools worldwide, including my own, had to switch to fully online learning practically overnight, universities in other places still have a bit more time to react.
This is a chance for every educator to go digital and thus avoid postponing or skipping their classes. After all, we don’t know how long this crisis will force us to lock down our educational facilities.
After some colleagues approached me for advice, I thought I’d share a few personal experiences. I grouped my 10 steps on “how to go digital with your teaching” into four stages, in each of which you have to consider a few crucial things for your course, as illustrated in the Figure below.
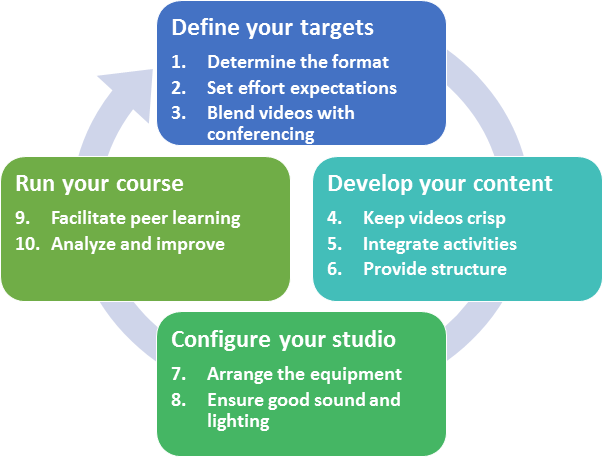
Define your targets
Step 1. Determine the format
First, you have to determine what the main materials of your online course should look like. A maths lecture likely requires a different online format than a lecture in sociology.
The choice of format obviously has implications for the ways of how you record your content and yourself, within the limitations of your home- or office-based studio. You might, for example, end up with one of the three following options:
Talking over slides: In this case, you might want a video recording solution that integrates with PowerPoint and, optionally, records a video of you as the speaker, too. Our school uses Panopto, which makes multi-stream video recording as simple as selecting your webcam from a drop-down list of detected video sources, opening your PowerPoint presentation, and pressing record.
Talking and writing formulas: In this case, you will need a solution that effectively focuses on your writing in a readable way (on paper, on a whiteboard, or on the screen of a tablet), while the image of you as the speaker becomes relatively less important.
Simply talking into the camera (with or without selected exhibits): In this case, you could simply film yourself with your smartphone, even on the go (selfie-stick recommended) and would just need to do a few edits later to add the exhibits.
There are also different preferences as to whether presenters want to record themselves with video or just voice. Some of my students indicated, however, that it creates a sense of proximity and better comprehension if they actually see the speaker next to the other visual content. Maybe video helps mitigate the adverse impacts of social distancing.
Step 2. Set effort expectations
Somebody’s got to say this: Creating online education courses consumes a great deal of time! So, you’d rather make a conscious decision upfront on how much time and effort you are willing and able to put into this, next to potential other obligations (be it research, projects, or taking care of your kids).
Specifically, you might want to ask yourself: Is this something you do for just one semester, do you want to use this crisis as an opportunity to create something with longevity, something that can be reused? In other words, do you see going digital as a short-term or a long-term investment?
Many things may play a role here, for example, how good you are at speaking freely in front of a camera, how large your course is, how long you will be teaching the course, how likely you are to teach a similar course elsewhere, and where you currently stand in your career.
This decision influences, for example, whether you will script videos, how much effort you will invest into editing them, and which blend of synchronous and asynchronous teaching you might choose (see step #3).
While it’s tempting to use this crisis as an impetus to totally rethink your teaching, my experience is that students do not discriminate strongly between professional studio and home studio quality, as long as the content is in place.
To keep up teaching operations in times of crisis, OK quality may be just good enough.
Step 3. Blend on-demand videos with live video conferencing
The question of effort also influences the targeted synchronicity of your online teaching. Basically, you have two options, each with different pros and cons.
Asynchronous learning (i.e., recording videos and providing them online for on-demand viewing): Recorded videos leverage the key strength of online education that they give the students the flexibility to watch them whenever and wherever they want. Your students may have certain life situations – especially these days – and on-demand video allows for better control learning experiences. The main downside is that there is no place for live interaction in lecture videos (that’s why you should integrate activities, see step #5).
Synchronous learning (i.e., holding live video conferences and interacting with your students in real-time): Live video conferences emulate more closely the classroom situation and they tend to be less effortful to prepare compared to on-demand videos. On the downside, you have less control over the experience because some technicalities (e.g., low bandwidth) can easily get in the way of the learning experience. It actually requires some experience to moderate live conferences well while getting across your lecture content.
The answer is not one or the other – it’s the purposeful combination of the two that enhances the learning experience in a meaningful way. For example, if you do case-based teaching with a lot of interaction in class, how would you migrate that to the digital space? Well, you could provide a video introducing the case and explaining the task, then have the students work on it at home and upload their results to a forum. Finally, you would have a live conference where students present their solutions and you can wrap-up the case.
So my rule of thumb: if the content or tasks require time to digest and have predictable results, then asynchronous learning is the best teaching method; if the content or tasks emphasize interaction and have less predictable results, then synchronous is the better approach.
In the past, we talked about blending online and the classroom. In the future, we will have to think more about blending synchronous and asynchronous online learning.
Develop your content
Once you are clear about the target picture of your online education, you can start developing the content. A few notes on that.
Step 4. Keep videos crisp
In case you haven’t heard it yet, brevity is king when it comes to online education. So recording a 2-hour lecture that you are used to from the classroom just won’t fly. Research shows that the attention span of online learners is 5 to 10 minutes.
So cut your content into digestible pieces. Five to ten minutes, that usually means 2-3 slides max. Depending on your common lecture style, you may need to focus on the essential and reduce (back to step #2). Don’t cry a tear for all those anecdotes you used to tell in class.
Pro tip: Use PowerPoint animations. Not the flashy ones, just the simple appearance. It’s a bit old-fashioned, I agree. But walking students through a list of bullet points or a complex model will work better if you build up your slide bit by bit.
Step 5. Integrate activities
Because on-demand videos minimize interaction and engagement (step #3), I suggest integrating short activities after each two to three content videos – maybe less in graduate courses and more in undergraduate courses. Note: I am assuming here your school provides a learning management system (LMS) where you can design the flow of the course page (Moodle, Canvas, Blackboard, etc.).
Online activities can be quizzes, polls, open-ended, discussions, and many more. In my experience, students love multiple-choice quizzes (if well designed), especially undergraduate students. No-brainer: Make sure that the questions relate to the preceding videos and assess the achievement of learning objectives in a meaningful way.
Polls are great to stimulate a discussion and they can be combined with open-ended questions, in the style of: Vote whether you agree or disagree with claim XYZ, and provide a short statement why. You can configure forums in the way that students can view other replies only after having posted.
These and other activities are not primarily made to test the students, but to keep up the engagement of the online learners and have them learn from each other. In this sense, they are different from assignments. That’s why I suggest integrating multiple short activities rather than a few big ones.
Step 6. Provide structure
One thing that is useful in the classroom, but indispensable in online education is: structure. This is because a clear outlook on what remains to be conquered provides orientation and strengthens the motivation. Also, there is less room for online learners to ask questions to their peers and educators, so you want to be clear from the outset.
Ideally, you would want to provide a structure that aligns with your learning objectives for the course and for each session. So, tell the students what you are going to teach them (the agenda), tell them what you teach them (the content), and tell them what you just taught them (the conclusion).
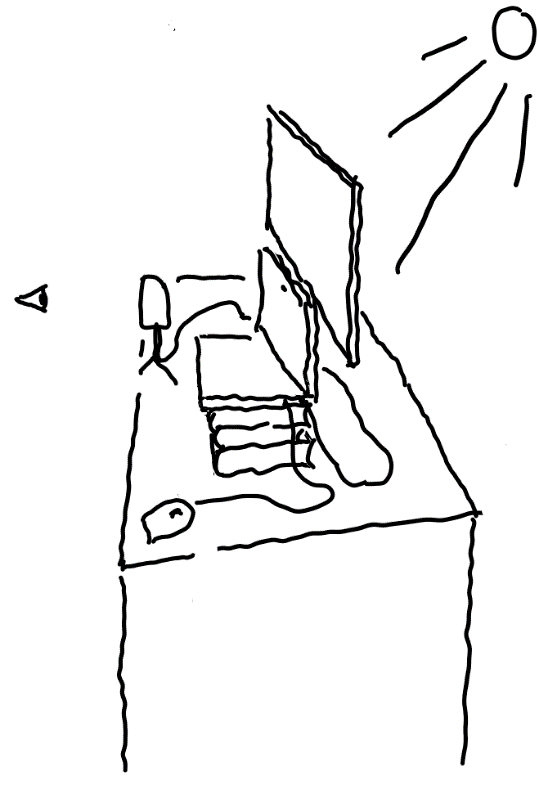
You can also use some sort of framework and thus provide your students with a mental map of the content to be conquered (see the adjacent example). So, start low and incrementally increase the difficulty. Try to take your learners by the hand and guide them through this journey as good as you can.
Configure your studio
Now you have set your targets, created your content, and are ready to record. But how to approach it? It’s not a rocket science, but with a few tweaks, you can make your self-made recordings look and sound at least on a level that is on par with all the YouTubers out there.
Step 7. Arrange your equipment
Camera positioning: It’s recommended to have the camera on eye level, or just slightly below (if you wish to underline your authority). So don’t just speak down to the built-in camera of your laptop screen, lift the laptop with a few books or boxes and it will create a much better impression of you.
Teleprompter substitute: Assuming you have scripted something or made some notes about what to say, where would you place them while recording? The answer is: Just behind the camera. But paper notes won’t scroll. My recommendation is to work with a second screen here behind your laptop which displays the document with your notes.
Flipping slides: Call me nitty-gritty, but you wouldn’t want to have the clicks of your keyboard, mouse, or presenter on the recording if you can somehow avoid it. I tend to flip slides, and scroll down my notes, with the same mouse wheel. This way I can hover over the document to scroll and back to the presentation to move though my animations. It requires just a bit of dexterity but works just fine.
Step 8. Ensure good sound and lighting
While ok for a voice call, built-in computer microphones will make your video sound flat and tinny. This can get tiring for the listener. If you want to make a little investment with a great impact, this is the place. USB condenser microphones for podcasters and alike start in the two-digit price Euro/Dollar price range. If you plan to be further away from the camera or need to move around in the room, a lavalier clip-on microphone may be the better choice.
The same goes for lighting. Proper lighting makes a whole difference. Conventional room light does not work as it will make your skin look yellow. So you either move your recording setup to where sunlight enters the room (diffuse light, no direct light!) – Or, if you don’t want to depend on the weather, you get some inexpensive LED camera lights or softboxes for your (home) studio. With such lights, you can actually keep the curtains closed.
Run your course
Now you’re done with recording your stuff, you edited and uploaded everything and integrated it into the course page of your school’s LMS – what’s next when you gradually start unblocking your content?
Step 9. Facilitate peer learning
Now you just have to “be there” for your course. Students may have questions, problems, special needs, especially if they are new to digital learning, too. Luckily, there are a few strategies you can use especially in large courses to prevent your inbox from overflowing, even if you don’t have a teaching assistant to help:
Q&A forum: Establish a central Question-and-Answers online forum as the central point of contact. This way, students can help each other out and answers are visible to everybody. If you have any means to incentivize students to also reply to each other, even better.
Group work: Assign your students to groups and have them independently work on specific tasks (see step #5). Remember, your students may be sitting at home in isolation, so they should appreciate the interaction in smaller groups to compensate for the lack of the social experience in the classroom.
Break-out groups: Even many live conference tools for synchronous learning allow splitting students into break-out groups which you can listen-into and provide specific help.
Peer reviews: Some LMS and external platforms allow you to orchestrate peer review processes, both asynchronously (with defined hand-in deadlines and review deadlines) and synchronously. While peer-reviewing taps into an additional source of feedback for the students, experience tells that students need to be instructed well to learn how to give feedback to their peers that is also valuable to them.
Step 10. Analyze and improve
The tricky thing about online teaching is that you don’t get the same level of feedback from the students that you get in the classroom. I sometimes compare this with a “blind flight” issue. Unless something really breaks, nobody will tell you. So you need to raise your antennas and extend your senses.
Micro evaluation: Explicitly ask for direct feedback. For example, you could have a short poll after every session surveying the students’ satisfaction with the session and encouraging them to specify their feedback in a comment field. In Panopto’s video platform, students can also rate or ‘like’ the videos.
Analytics: Keep track of the numbers. Some LMS and video platforms do provide basic analytics. Which were the most challenging questions in the quizzes, which are the most frequently watched videos, etc.? This information can give valuable clues about content items that may still need some brush-up.
Continuous improvement: As online educators, we need to experiment and constantly evaluate what works and what can be done better – maybe even more than we did in the traditional classroom situation. Get started with it and stay authentic, and you will see that students will reward your efforts.
A final note
I compiled this list of pragmatic steps to help colleagues manage the transition to online education in the wake of the crisis. I guess nobody wants to see students lose a semester and create a gap in the development of our future global talent.
As educators, we are in a privileged situation that we can actually continue with what we are doing, just by slightly new means. Higher education needs to keep up or resume to normal teaching operations as good as possible and maybe, in the end, we will find ourselves in a more digital education landscape.
I hope this humble article can make a contribution to help us all achieve this!

Author
Till Winkler
Associate Professor and Associate Dean at Copenhagen Business School